Create a shipping rate
What a shipping rate does in Zonal
A Shipping Rate in Zonal controls when a courier is offered to customers and how much that option costs. Each rate is linked to a specific Courier, then refined using destination, timing, weight, order value, postcode, and price rules.
Use shipping rates when you want the same courier to have different prices or availability based on where the order is going or what is in the basket.
Before you create a shipping rate, make sure the courier already exists in Couriers. If you have not created one yet, set that up first so it appears in the Courier dropdown.
Create a shipping rate
In the Zonal app, go to Shipping Rates and click Add Shipping Rate.
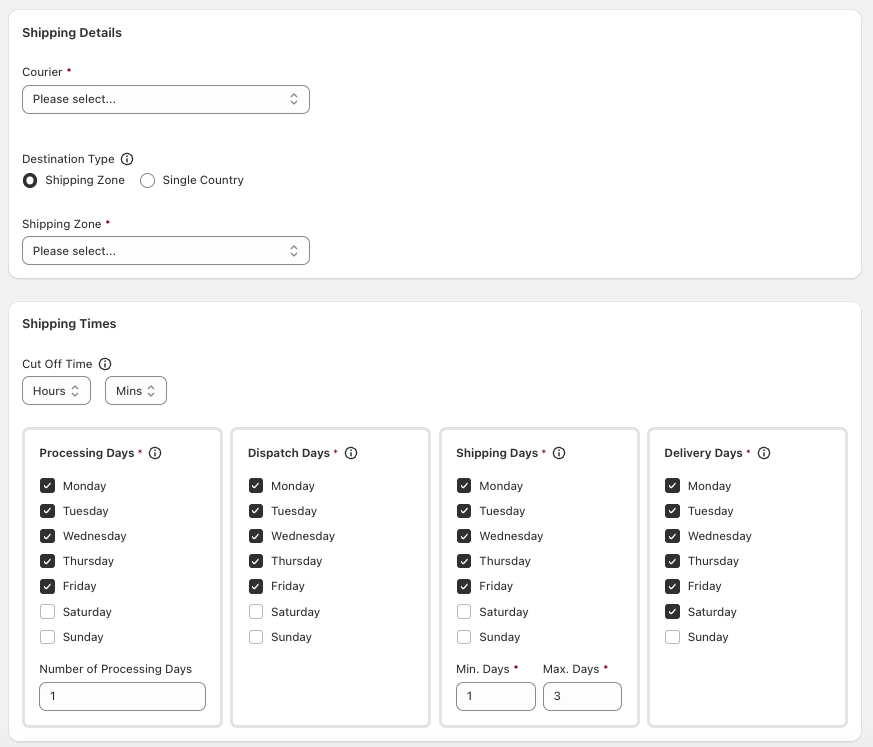
In the Shipping Details section, use the Courier dropdown to select the courier this rate should apply to.
Under Destination Type, choose whether the rate should apply to a Shipping Zone or a Single Country.
- Shipping Zone: use this when the same rate should apply across all countries in a zone.
- Single Country: use this when the rate should apply only to one country.
After choosing the destination type, select the relevant Shipping Zone or country from the dropdown list.
In the Shipping Times section, set the Cut Off Time and choose the days used for Processing Days, Dispatch Days, Shipping Days, and Delivery Days.
Enter the Number of Processing Days. This defaults to 1. Then enter the Min. Days and Max. Days for shipping.
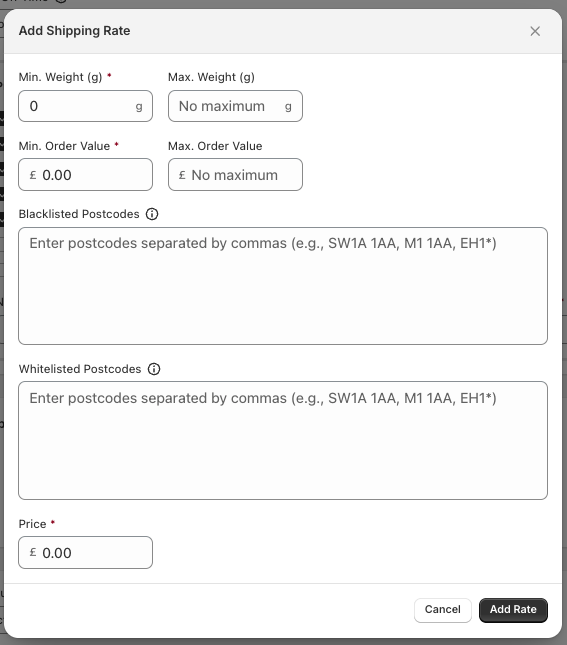
In the Shipping Rates section, click Add Shipping Rate to open the rate popup.
In the popup, complete the fields that define when this rate should apply:
- Min. Weight (g): the lowest basket weight for this rate.
- Max. Weight (g): the highest basket weight for this rate, if you want to cap it.
- Min. Order Value: the lowest basket value for this rate.
- Max. Order Value: the highest basket value for this rate, if needed.
- Blacklisted Postcodes: enter comma-separated postcodes or postcode areas with a wildcard, such as
SW1A 1AA, M1 1AA, EH1*. Customers using these postcodes will not be offered the courier rate. - Whitelisted Postcodes: enter comma-separated postcodes or postcode areas with a wildcard if the rate should be offered only to matching postcodes.
- Price: enter the amount customers should be charged for this rate.
Click Add Rate to save the rate band.
How the timing fields work
Cut Off Time
Cut Off Time sets the latest time an order can be placed for that day's handling rules to apply.
Processing Days
Processing Days are the days your team works on preparing orders. Number of Processing Days sets how many of those working days are needed before dispatch.
Dispatch Days
Dispatch Days are the days parcels can leave your business.
Shipping Days
Shipping Days define the valid transit days for the courier. Use Min. Days and Max. Days to set the shipping range.
Delivery Days
Delivery Days define the days customers can receive their order.
If a courier does not operate on weekends, leave Saturday and Sunday unticked where appropriate so the delivery promise stays realistic.
How postcode rules work
Blacklisted Postcodes
Use Blacklisted Postcodes when the courier should not be available in certain areas.
This is useful for excluding remote locations, surcharge areas, or destinations the courier does not serve.
Whitelisted Postcodes
Use Whitelisted Postcodes when the courier should be available only in certain areas.
If you add whitelist values, the rate is restricted to matching postcodes only.
Check blacklist and whitelist entries carefully. An incorrect postcode pattern or wildcard can stop a shipping rate from appearing for customers you intended to include.
Before you save
Make sure the correct Courier is selected.
Confirm whether the rate should apply to a Shipping Zone or a Single Country.
Check that Cut Off Time, processing, dispatch, shipping, and delivery days match the courier's real service pattern.
Review weight and order value ranges so rate bands do not overlap in unexpected ways.
Double-check postcode restrictions before saving.
Confirm the Price is correct.
Related information
If you need to create the courier first, see Create a courier.